FlowRepository - Quick Start Guide
Introduction
About
FlowRepository is a web-based application accessible from a web browser that serves as an online database of flow cytometry experiments where users can query and download data collected and annotated according to the MIFlowCyt standard. It is primarily used as a data deposition place for experimental findings published in pier-reviewed journals in the flow cytometry field. FlowRepository is funded by the International Society for Advancement of Cytometry (ISAC) and powered by the Cytobank engine specifically extended for the purposes of this repository.
This Quick Start Guide describes the most common use cases of working with this repository. Further information can be obtained from
-
Reviewing green
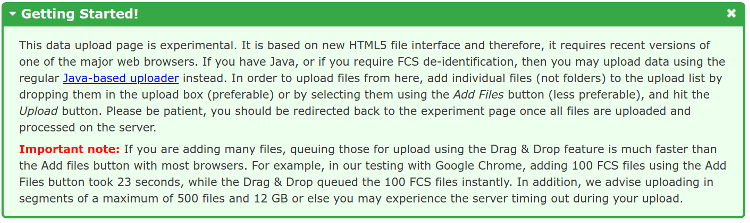
Getting Started: ....
 boxes that are placed on various pages within the repository application to provide contextual information and guide users working with the repository.
-
Placing mouse over the
 in the circle on in top right corner of most blue boxes, which will invoke an additional information window.
Client Requirements
FlowRepository has a few requirements for the computer operating system and web browser you use. Currently, you can use Windows (XP, Vista, Windows 7, Windows 8), Mac OS X (10.3 or above), or Linux (Ubuntu, OpenSUSE, Fedora, Red Hat). As for your web browser, we recommend the latest version of Firefox. You may be able to run FlowRepository using some other major web browsers, such as Apple Safari, Google Chrome, Internet Explorer; or even other systems, such as iOS or Androind phones and tables, however, you may not be able to access all functionality or the web site may not appear as nice.
In order to create analyze data online, your browser should be able to run Java version 1.5.1 or higher. You can verify your Java version using an Online Java Tester directly from your web browser. If needed, Mac users should use the apple software update feature to install Java, Windows users can get the latest Java from a Java Download Page, and Linux users should preferably obtain Java and the Firefox Java plugin directly from their distribution. Java is also required for data upload and download if you select the Java-based uploader or downloader. However by default, you will be directed to our new upload and download pages that do not require Java any more.
Finally, while anonymous read-only access is supported, we encourage users to register in order to gain full access to the FlowRepository. Please see our FAQ if you need help to register or login.
Data Organization and Availability
Data in FlowRepository is organized based on so called Experiments. Experiments in FlowRepository typically undergo through several stages. First, they are private or shared among a group of specified researchers, who upload all related data and provide annotations as required by MIFlowCyt. The private period is limited to one year. Once the experiment is ready, researchers will typically be also submitting a manuscript to a pier-review journal. At that point, they should generate an anonymous access key (64 character string) and share it with the reviewers (e.g., placing it in the cover letter). This will get reviewers a read-only access to the experiment. Finally, once the manuscript is accepted, the experiment with all its data and annotations will become publicly available.
Retrieving Data
Public view of FlowRepository can be accessed by navigating to the flowrepository.org landing page. From there, you may choose to login/register or to continue using FlowRepository anonymously. A login link is offered in the right corner if you are not logged in. If you do log in, a more complex menu (shown below) will offer you a variety of options to browse, submit, annotate and even analyze data online. If you are logged in, the Public View (as shown to anonymous users) is always accessible via the Public View link in your menu. Some additional items in the menu may be shown depending on your access level.

Querying the Repository
Querying the repository is as simple as entering a term in the Query field and hitting the query button. By default, your term will be searched among all possible fields, e.g., experiment names, repository identifiers, keywords, sample annotations, Pubmed identifiers, etc. This may be restricted by unchecking appropriate options as shown below (some of these may not yet be implemented). Once a query is submitted a list of matching experiments is shown including details such as experiment name, repository identifier, Pubmed identifiers, number of FCS files, primary researcher, MIFlowCyt Score (an automatically calculated metric of compliance with the MIFlowCyt Recommendation), etc. An experiment may be selected from the retrieved list.
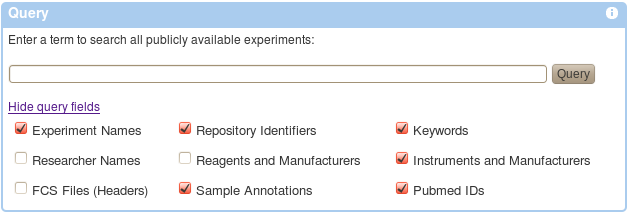
An alternative to querying is to browse all publicly available experiments or to browse Community Datasets (experiments that have been marked as special by repository administrators). Appropriate links can be found below the Query form.
Experiment Summary
Once you have selected Experiment in the Public View,
you will see summary information about the experiment as specified by the first section of MIFlowCyt.
Namely, an Experiment Overview panel will display experiment name, MIFlowCyt score, names of the primary researcher, investigater and person,
who uploaded the data, when was the experiment created and lastly updated, when did it start and end, whether there are any labels or keywords,
what are the associated organization, what was the purpose and what were the conclusions of the experiment, any comments, and what kind of quality
control measures have been used, and any funding disclosed. Relations to journals and specific manuscripts may also be included. If there are
experimental variables defined then these may also be listed.
An example of this information is shown below. If you want to see more details about the experiment, please register, login and view the experiment
in your inbox.

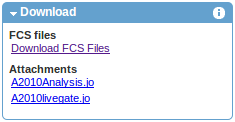
Data Download
Files associated with the experiment may be downloaded from the download section on the left. As shown in the example below, besides FCS data files, download options typically include figures provided by the authors and various types attachments.
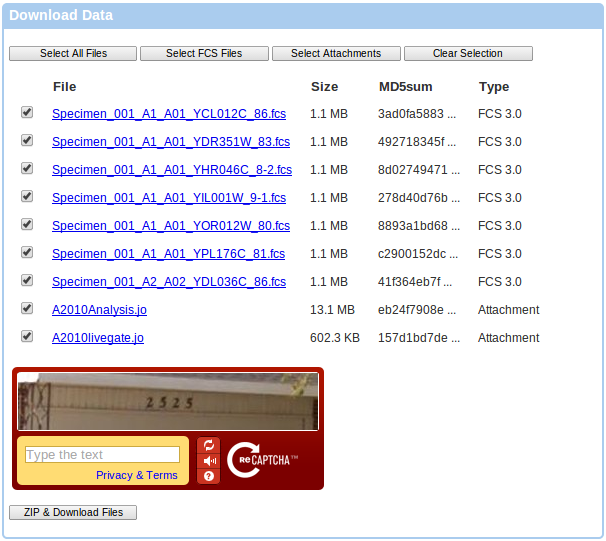
If you follow the Download FCS files link, you will be directed to a data download page that allows you to ZIP and download selected files. You can use the Select All Files, Select FCS Files, Select Attachments and Clear Selection buttons to select the desired files. You can also use shift selection in order to select a range of files. Click on the checkbox of the first file you wish to select, then hold down the Shift button and click on the checkbox of the last file that you wish to select. You will be required to solve the CAPTCHA at the bottom of the page since you are not logged in. Please note that creating the appropriate ZIP file on the server will take a bit of time, so please be patient. Typically, the server can zip about 300 MB per minute, so if you have selected hundreds of megabites of data, it will take some time before the download starts. Your browser will keep checking the status with the server and keep you posted about the progress.
Alternativelly, you can download single files by clicking on the name of any of the listed files, or you can also switch to a Java-based downloader as described further.
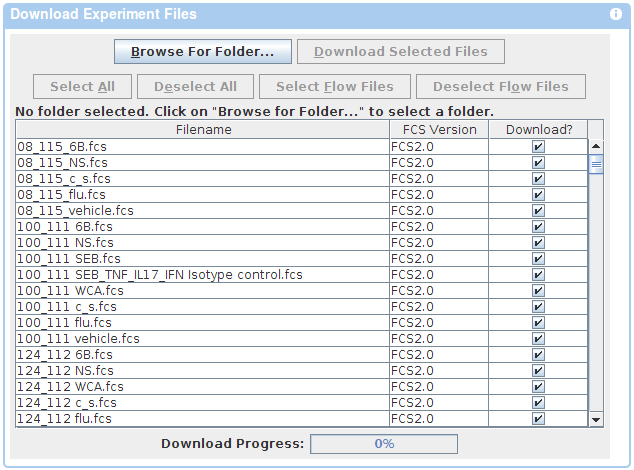
If you wish to use a Java based downloader instead, follow the appropriate link in the Instructions panel on the download page. Choose Browse in the Java Applet window and navigate to the folder where you would like to save the files. Once you have found the folder, choose Open. Click the Download button at the top of the file list to begin download.
Submitting Data
Creating Experiments
You have to be logged in in order to submit data to flow repository. Please see our FAQ if you need help to register or login. Once you are logged-in, if you are in the public view, you can start submitting by following the Submit data link. If you are in your Inbox,you can follow the Create a new experiment link. Either of these links will direct you to a Bank New Experiment page where you should provide the following:
- Experiment Name (required): A short title for the experiment that will help you remember it when searching in the future.
- Primary Researcher (required): Usually you. The person doing the experiment.
- PI/Manager (required): The person organizing the project.
- Kit: (optional): The kit used to perform this experiment, if applicable.
- Starting Date: (required): The starting date of the experiment.
- End Date: (optional): The end date of the experiment, if applicable.
- Purpose: (required): A description of why you did the experiment, what you hoped to see. This should be a 2-3 sentence description that would explain what this experiment is to someone other than you.
- Conclusion: (optional): A description of the outcome of the experiment, what you did see. This should be a 2-3 sentence description that would explain the outcome to someone other than you.
- Comments: (optional): Any notes or caveats.
- Quality Control Measures: (optional): A description of the quality control measures used such as replicates, calibrations, control assays, etc.
- Quality Control Experiment: (optional): If another experiment was performed for the purposes of establishing quality control standards, that experiment may be referenced.
- Funding: (optional): You may reference funding sources for this experiment.
- Keywords: (optional): A few key terms characterizing the experiment (comma-separated list).
- Organizations: (optional): Organization(s) performing the experiment.
- Pubmed IDs: (optional): A numeric Pubmed ID of a publication associated with this experiment or a comma-separated list of multiple numeric Pubmed IDs if multiple publications are related to this experiment.
- PMC IDs: (optional): A PMC publication identifier (i.e., PMCxxxxxxxx) of a publication associated with this experiment, or a comma-separated list of multiple PMC IDs if multiple publications are related to this experiment.
Uploading Data
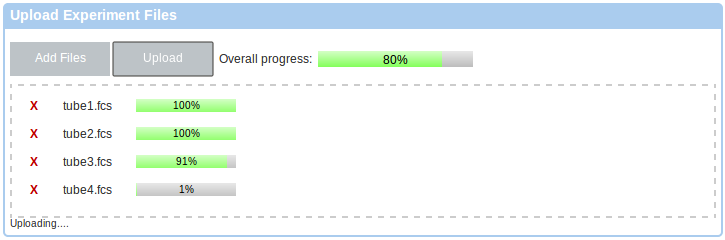
Once you have submitted this information, you will be directed to a data upload page as show below. Please follow the instructions in the Getting Started box in order to upload your data files. Please note that the upload process will have a lower chance of timing out if you keep the number of files below 500 and the total number of GBs to upload under 12 GBs for each uploading segment.
Once you have added some files to the upload list, you can click the Upload button to start the upload. You will be redirected back to the experiment once the upload is finished and data files processed on the server.
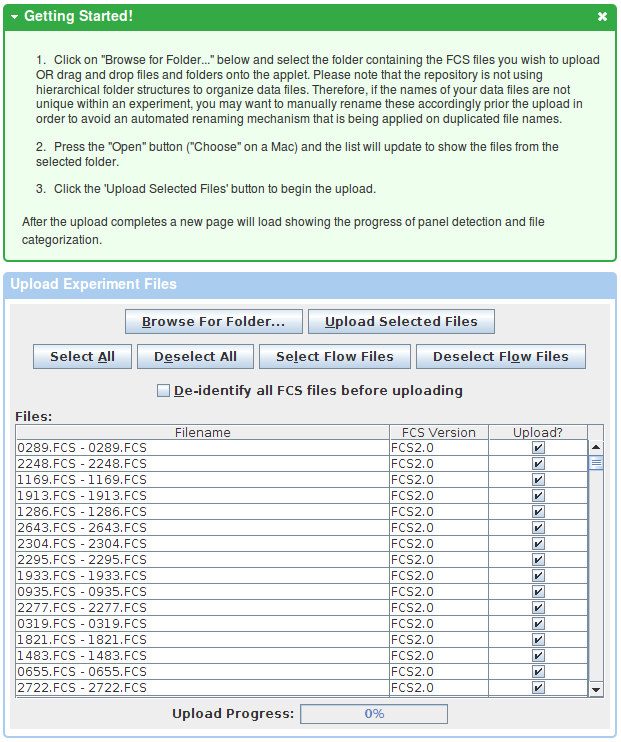
If you you prefer a Java-based upload, or if you require data de-identification, please follow the link to the Java-based uploader as listed in the instructions box. This will working require Java in your web browser. Please follow the instructions in the Getting Started box.
After the upload finishes, data needs to be categorized into experiment files, compensation controls and other controls (lyocells, beads, etc). Flow repository can handle the categorization automatically in most cases. Experiment files are further assigned to staining panels, which again are automatically detected based on parameters present in each of the FCS files. However, users have the option to manually adjust the automated categorization.
De-identifying Data
De-identification is a process to remove identifiers that could be used to identify an individual. Generally, privacy rule requirements do not apply to information that has been de-identified, and therefore, de-identified data may typically be shared for research purposes. Please refer to the Health Insurance Portability and Accountability Act (HIPAA) information on De-identification of Protected Health Information or to relevant information from an appropriate regulatory authority as applicable based on your residence.
FCS data files contain a segment with keyword/value pairs. Most of these keep basic information essential for the interpretation of the raw data matrix of fluorescence expression levels and other values. These include the number of acquired parameters, their names, acquisition voltage settings, the total number of events (particles), and many other keywords as specified in the FCS data file standard. In clinical environments, some of these keywords may include identifiers that could be used to identify an individual and shall therefore be removed. Generally, there are several approaches to de-identify the FCS files:
Probably most conveniently, you may use FlowRepository's fully automated FCS de-identification utility by checking the De-identify all FCS files before uploading check-box that is included in the upload Applet in the Java-based upload as shown above. This de-identification is integrated in the data upload process and is performed on your computer locally so that sensitive information does not leave your computer. Automated de-identification means the removal of all keyword values of FCS keywords that are not in the list of safe essential keywords. This list has been created based on the FCS data file standard as well as careful examination of a few hundred FCS data files produced by dozens of instruments from several vendors. Currently, the list contains these safe essential keywords: $BEGINANALYSIS, $BEGINDATA, $BEGINSTEXT, $BYTEORD, $DATATYPE, $ENDANALYSIS, $ENDDATA, $ENDSTEXT, $MODE, $NEXTDATA, $PAR, $TOT, $DATE, $BTIM, $ETIM, $TIMESTEP, $TR, $SPILLOVER, SPILLOVER, SPILL, $SPILL, $VOL, $COMP, $PnB, $PnE, $PnN, $PnR, $PnV, $PnS, $PnG, $PnF, $PnL, $PnO, $PnP, $PnT, $PnD, $PnCALIBRATION, $DFCiTOj, $CYT, $CYTSN, APPLICATION, LASERnDELAY, LASERnNAME, LASERnPOWER, LASERnWAVELENGTH, $SYS, FIRMWAREVERSION, NOZZLEDIAMETER, NUMSORTWAYS, SHEATHPRESSURE, UTOPEXBUILD, VOLTAGECHANGED, CREATOR, PnCHANNELTYPE, PnLASER, PnBS, PnMS, PnDISPLAY, APPLY COMPENSATION, THRESHOLD, AUTOBS, FSC ASF, WINDOW EXTENSION, CYTNUM, #CFLOWDECADESn, #PnVirtualGain, #CFLOWCAPTUREDDATE, #LASERCONFIGURATION, #CFLOWnCOLORCOMP, #ATIM, #ACQUISITIONTIMEMILLI, #SPACERS, #PnMaxUsefulDataChannel, TEMPELECTRONICS, $PnDISPLAY, Manufacturer, Acq. Software, FJ_FCS_VERSION, FJ_$TIMESTEP, FJ$ACQSTATE, FJ_$PnR, $PROJ, CST BASELINE DATE, CST SETUP DATE, CYTOMETER CONFIG CREATE DATE, CYTOMETER CONFIG NAME, CST BEADS LOT ID, CST SETUP STATUS, $PKn, $PKNn, TUBE NAME, WIDTHPARAMUPSHIFT, SOFTWAREREVISION, P$SPEED, P$SPEEDIS, P$ACQTIMES, P$COUNTVOLUME, P$CNTSENO, P$CELLCONC, P$PMODEn, P$PLLn, P$PULn, TEMPOPTICS, $LOST, LasernDelay, @CYTOMETERID, @CAROUSEL, @Y2KDATE, @Acquisition Protocol Offset, @STOPREASON, @ABSCALFACTOR, ACQTIME, @BUILDNUMBER, @RATIONUMERATORMUX, @RATIODENOMINATORMUX, @BASELINEOFFSET, @COMPENSATIONMODE, @RESAVEDFILE, $RUNNUMBER, @PnADDRESS, @PnU, @PnC, @PnZ, @PnQ, @TUBENO, @PnX, @DISCRIMINATOR, $WELLID, $ETIME, @PANEL, VSH_APP, VSH_APP_VERSION, ANALOG_COMP, @CRS20BITFORMAT, @BLUETARGETPOWER, @REDLASERSHUTTER, @VIOLETLASERPOWER_START, @AUX_SIGNAL, @BLUELASERPOWER_START, @REDLASERPOWER_START, @BLUELASERPOWER_END, @VIOLETLASERPOWER_END, @BLUELASERSHUTTER, @REDLASERPOWER_END, @VIOLETTARGETPOWER, @REDTARGETPOWER, @VIOLETLASERSHUTTER, PnLo, PnHi, PnDetectorName, PnType, QnS, QnI, QnU, GTI$BEGINLOG, GTI$PLOTxxx, GTI$PARAMxxx, GTI$Rxxx, GTI$CHANxxx, GTI$DILUTIONFACTOR, GTI$QUANTITY, $RnI, GTI$WIDTHSCALE, GTI$TERMINATIONCOUNT, GTI$Gxxx, GTI$ANALYSISDATE, GTI$AREASCALE, GTI$ENDLOG, GTI$REFRESHRATE, GTI$ANALYSISTIME, GTI$COMPENSATIONxxx, GTI$NGATES, GTI$SUBREGIONLIST, GTI$PMTxxx, GTI$HIGHCONCTRIGGER, GTI$NUMPLOTS, GTI$ERRORCOUNT, GTI$ANALYSISSETUPEND, GTI$ASSAYTYPE, GTI$TIMESCALE, GTI$TOTALNUMREADINGS, GTI$INSTRUMENTTYPE, GTI$FLOWRATECAL, GTI$NREGIONS, GTI$PUMPSAMPLESPEED, GTI$ANALYSISSETUPBEGIN, GTI$ORIGINALVOLUME, GTI$WELL, GTI$SPILLOVERUUID, DET_SPILL, APPLY_COMPENSATION, TUBE_NAME, SOFTWARE, $ENDANYLYSIS, #PnMaxUsefulChannelDNA, WELL ID, PLATE ID, PLATE NAME, WORKSTATION, PANEL NAME, PANEL_NAME, START BATCH, END BATCH, BD$AcqLibVersion, BD$NPAR, BD$PnN, BD$WORDn, BD$LASERMODE, CalibFile, PnTHRESVOL, $TEMPELECTRONICS, $TEMPOPTICS, flowCore_$PnRmax, flowCore_$PnRmin, flowCore_$PnR, transformation, FCSversion, TIMETICKS, CYTOF_DATA_SHIFT, @PnGAIN, @RATIO_DENOMINATOR, @RATIO_NUMERATOR, @PnDIVIDER
Alternatively, you may use a software tool of your choice to de-identify the FCS files prior uploading these to FlowRepository. We offer a free, offline, command line, Java based de-identification utility. Another free utility is available from Frank Battye and another one from Tree Star.
In addition, there is also de-identification functionality integrated in FlowRepository server as described below. However, this functionality should only be used to review the contents of your data files or to remove information that you wish to be removed although it is not Protected Health Information (and therefore, it could be legally kept there). The advantage of this approach over the fully automated one is that you have full control over what information is removed and what kept. However, since this de-identification takes place on the server, you cannot legally use it to remove any Protected Health Information since that would mean that you have uploaded that information to the server prior to de-identification, which is illegal in most jurisdictions.
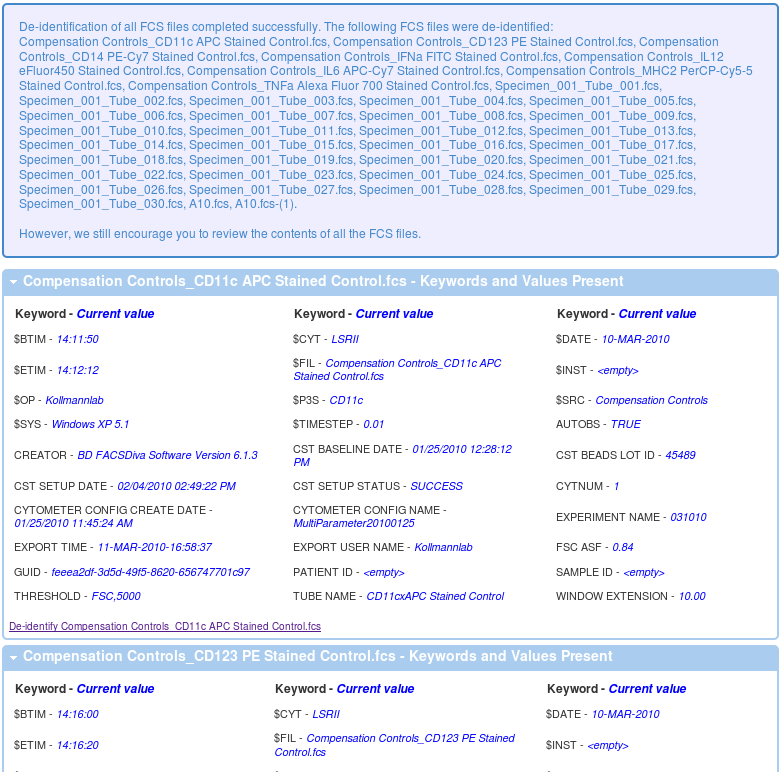
In order to de-identify your data on the FlowRepository server from your experiment overview, follow either the De-identify FCS Files or Review Keywords in FCS files links in your Actions menu on the left or similar links in the FCS Files box. Alternatively, you can also de-identify a FCS files when you are reviewing details of any FCS file. By following any of these links, you will get a listing of non-system keywords that could potentially include undesirable identifiers as well as values of these keywords for the selected FCS data file.
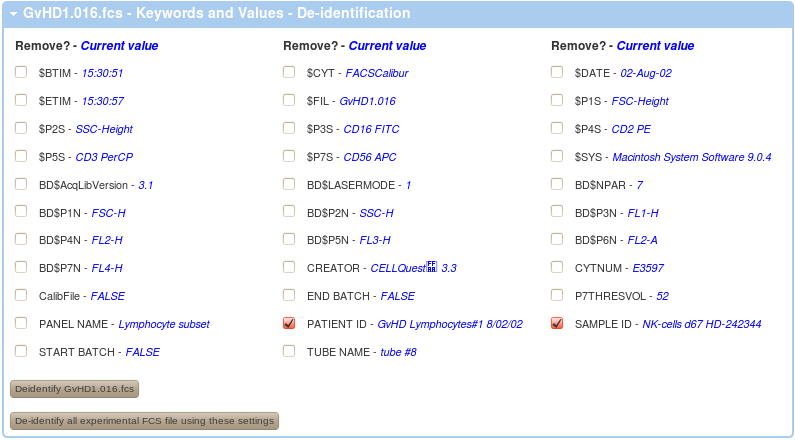
A value of <empty> indicates that there is no value in that particular keyword in the selected FCS file. However, there may still be undesirable values in other FCS files.
In order to de-identify your data, you have to select (check) the keywords that you wish to remove (the keywords will be kept but their valueswill be emptied). Further, you can de-identify the FCS files one by one or all at once.
- You can submit your selection to de-identify the selected FCS data file. This way, can de-identify each FCS file separately using specific settings. (Select any FCS file from the Experiment summery page and than click on De-identify the FCS file from the Actions tool bar on the left).
- Alternatively, you can request all experimental data files to be de-identified using the same settings. (Click on De-identify all experimental FCS files using these settings below.) If undesirable identifiers are present in specific keywords in the selected file, chances are that undesirable identifiers will be present in the same keywords in other FCS files within this experiment.
Once the process finishes, you should get a message like the one below with details showing you what is left in each of the data files.
... other files shown here ...
Preparing Annotation Data
Some annotations may be reusable among multiple experiments, FCS files, sample sources, etc. Therefore, Flow repository allows you to create a super-set of various annotations that may be reused to describe your experiment. It is therefore recommended that you follow the Annotation Data link prior annotating your FCS files and samples. Please follow the information in the Getting Started with MIFlowCyt Annotations box. Most importantly, you may want to make sure that you have all the needed templates (for both, samples and sample sources), organisms (imported from NCBI), and reagents. Providing appropriate details in the Annotation Data section will significantly simplify annotation of your FCS files later.
-
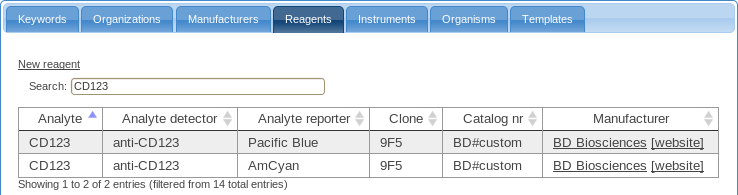
Reagents and Staining Cocktails
- The table of reagents contains a list of reagents and their characteristics as required by MIFlowCyt.
Before annotating the samples in your experiment, you should make sure that all required reagents are present in this table; add reagents here as necessary.
While annotating, you will be able to use these either directly or you may combine these into reusable staining cocktails.
-
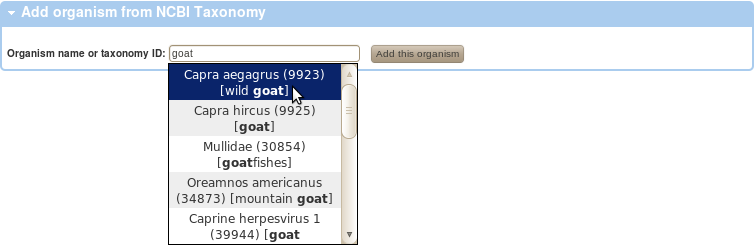
Organisms from NCBI Taxonomy
- The NCBI Taxonomy contains hundreds of thousands of organisms.
We have extracted about 20,000 of these, which is a list that contains all organisms that have a common English name or that appeared in GeneBank.
However, this list would still be too long to let users select from in a drop down selection.
Therefore, below is a selection of the few most commonly used organisms in flow cytometry.
If you have used a biological sample derived from an organism that is not listed, please follow the
Add organism
link and you will be able to add it from NCBI Taxonomy.
Start typing either the Latin or the English name, the auto-complete will show suggestions after the first 3 characters.
Once the organism is add and listed in the table below, it may be used to annotate biological sample source in your experiments.
-
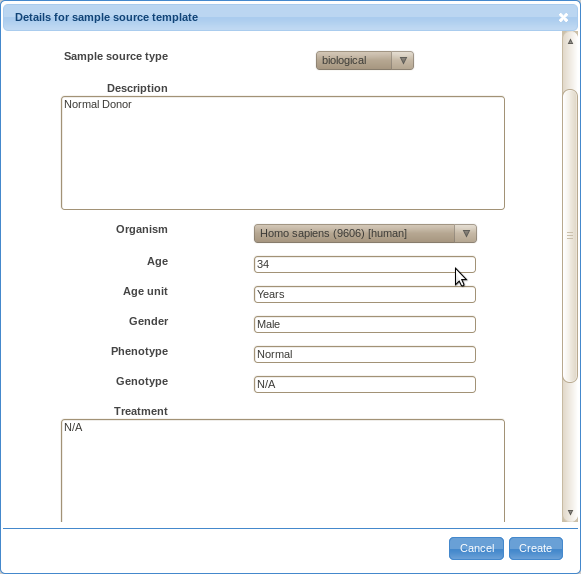
Templates for sample sources
- If your sample sources are similar to each other, it will save you time if you create templates.
For example, say you obtain blood from several normal donors.
In that case, you may want to create a template for the sample source as shown below.
You will have to provide a default value for all required fields.
You may enter '?' to fields that vary without any reasonable default value.
Later on, you will be able to change values for particular instances when annotating actual samples.
-
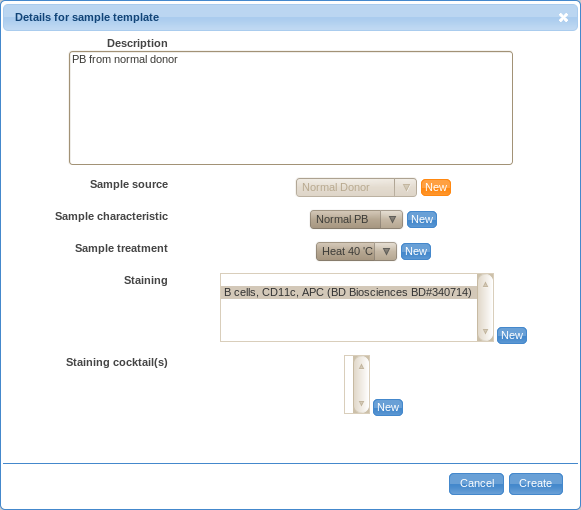
Templates for samples
- Similarly to sample sources, you can also create templates for samples.
In that case, you have to provide a description, sample source, characteristic, treatment and staining details.
Annotating Samples
Once you have all the required annotations ready, it's time to assign these to FCS files. From experiment summary, follow the describe sample link in the FCS Files Information box.
If you have appropriate templates created, you can utilize these at this point. As shown in the Figure below, we have utilized our Sample template 1 from normal donor as our sample and Normal Donor being used as the source.
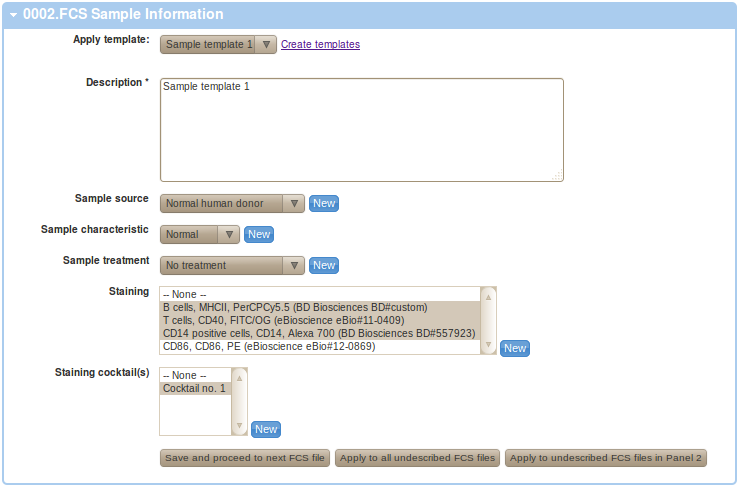
You may save the annotation and proceed to your next FCS file by clicking on the "Save and proceed to next FCS fle" button. Alternatively, you may also apply this particular annotation to all your undescribed FCS files by clicking on "Apply to all undescribed FCS files". This option is useful if you prefer to prepare your annotations in a spreadsheet table (e.g. MS Excel table) that you intend to use to provide your annotation details rather than filling up web based forms. See below for information on how to parse spreadsheets to extract annotations and apply these in FlowRepository. Finally, you may also apply this particular annotation to undescribed FCS files that are assigned to the same staining Panel as the current FCS file by clicking on "Apply to undescribed FCS files in ...". This option may be useful if annotations differ for different panel, as is commonly the case especially with staining. Please make sure your Panel assignment is correct before using this option.
Parsing Information from Spreadsheets
Some researchers find it useful to extract some of the sample and/or sample source annotations from a CSV file (spreadsheet) rather than providing these details by filling out on-line forms. This option may be especially useful for experiments containing many FCS files. If this is your case, use your favorite CSV-compatible spreadsheet tool to prepare a single table spreadsheet with sample and/or sample source annotations. You may use MS Excel, OpenOffice spreadsheet (Calc), a Google Doc spreadsheet or any other CSV-compatible program. Provide column headings in the first row. The spreadsheet shall contain a column named FCS File. In addition, there shall be one or more of the following columns:
- Sample Description
- Sample Characteristic
- Sample Treatment
- Sample Source Description
- Sample Source Treatment
- Age
- Age unit
- Gender
- Phenotype
- Genotype
- Location
- Other Sample Source Information
The location is applicable for environmental samples only. Annotation details shall be provided starting from the row number 2. The FCS File column shall contain file names corresponding to the data files in your experiment. Other cells shall contain values that you wish to assign to samples and sample sources associated with the particular FCS file. An example in MS Excel is shown below.
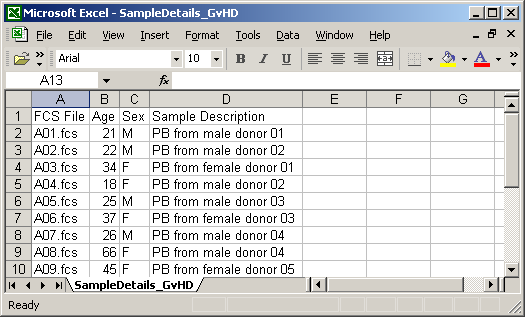
Save the spreadsheet to your local computer as a CSV file. This can be typically done by selecting the CSV option in the "File/Save", "File/Export" or "File/Download as" menu item. Make sure the field delimiter is set to comma (','). Files from MS Excel and Google Doc are typically compatible without any further tweaks. With OpenOffice, some versions tend to use semicolon as the default delimiter character. If this is the case then you will need to change it to comma by selecting the "Edit filter settings" in the OpenOffice Save dialog and choosing comma as the field delimiter (keep UTF-8 as the character set and quotation marks as the text delimiter). The file shall be saved with the .csv file name extension.
Use the Browse button within the Attachments box of your experiment view to locate your annotations CSV file and upload it as attachment to your experiment by pressing the "Upload" button. Parse the attachment to extract and update information by clicking on the parse icon (P in circle) next to the CSV attachment listed in the Attachments box as shown below.

You will need to confirm that you understand the consequences of performing this action. Specifically, it will replace some of the annotations saved in FlowRepository with values specified in your CSV file without the option of going back. Since the MIFlowCyt required annotation depends on the sample type, you can only apply annotations from a CSV file to samples that have the sample type assigned already. This means that the sample must have been previously annotated, which can be verified by reviewing the Sample column in the FCS Files box in your experiment view (it should be displaying the 'show sample description' link rather than the 'describe sample link').
Finally, review the results of extracting information from the spreadsheet by inspecting the information box that will temporarily appear on the of your experiment view. The information box will list annotation details than have been applied as well as any unrecognized items or errors eventually. The notation of File[item]=value is used. For example, A01.fcs[age]=21 indicates that age field of sample source associated with FCS file A01.fcs has been set to the value of 21.
Experiment Variables
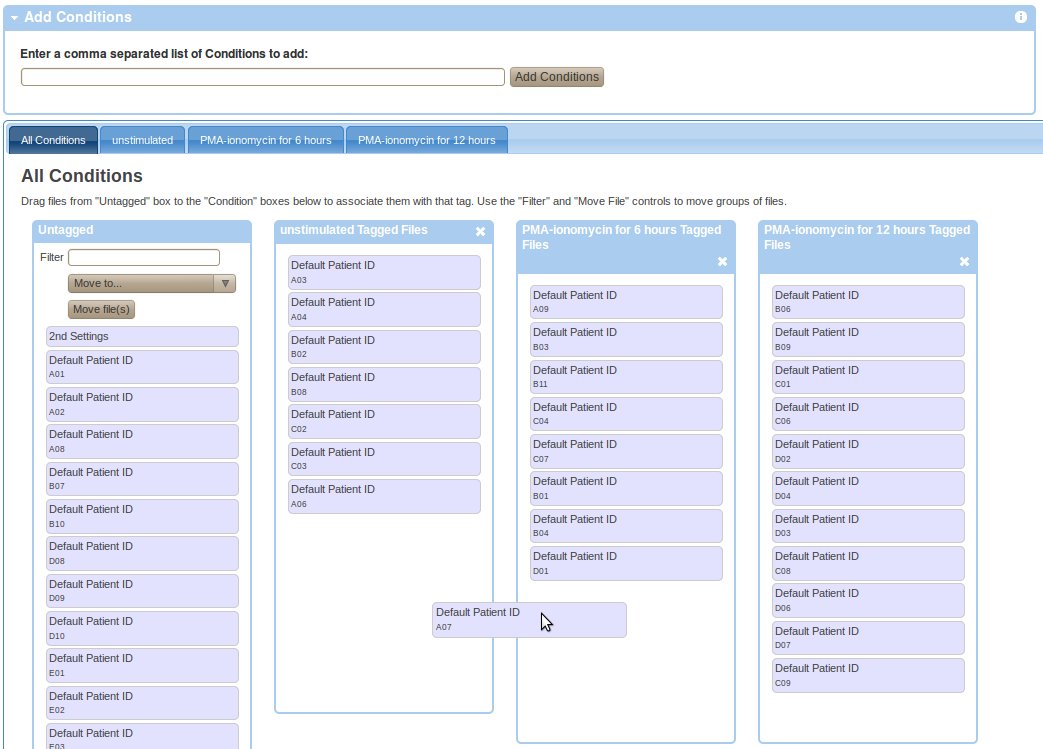
Experiment variables are attributes that differ between samples within an experiment due to pre-existing differences in sample states or due to experimental manipulation of the samples. To provide experiment variables, go to your working illustration (experiment variables are commonly used as Figure dimensions), select the experiment variable type in the available dimensions (i.e., Conditions, Dosages, Timepoints, Individuals, Sample Types) and click on Setup in the particular variable box. Than enter a comma separated list of variable values in the add box and press the add button. Finally, drag and drop FCS files from the Untagged box to the appropriate boxes with the right experiment variable value as shown in the Figure below.
Parsing Experiment Variables from Spreadsheets
Similar to sample and sample source annotations, experiment variables may be prepared in the form of a CSV file (spreadsheet) that can be parsed by FlowRepository in order to extract the relevant data. The general approach is the same as mentioned above in the Parsing Information from Spreadsheets section. You can use your favorite CSV-compatible spreadsheet tool to prepare a single table spreadsheet. Provide column headings in the first row. The spreadsheet shall contain a column named FCS File. In addition, there shall be one or more of the following columns:
- Condition
- Dose
- Timepoint
- Individual
- Experimental variable sample type
These correspond to the supported experimental variable types. Annotation details shall be provided starting from the row number 2. The FCS File column shall contain file names corresponding to the data files in your experiment. Other cells shall contain values that you wish to assign as experiment variables related to particular FCS files.
Save the spreadsheet to your local computer as a CSV file with the ".csv" file extension and make sure that the field delimiter is set to comma (','). Upload the CSV file as attachment to your experiment and parse it by clicking on the parse icon (P in circle) next to the CSV attachment listed in the Attachments box. You will need to confirm that you understand the consequences of performing this action. Finally, review the results of extracting information from the spreadsheet by inspecting the information box that will temporarily appear on the of your experiment view.
Instrumentation Details
Please follow the details link for a specific FCS file in the FCS Files box in the experiment overview in order to provide instrumentation details for that FCS file. Once you navigate to the FCS details page, please locate the FCS File Instrument Settings box for that specific files. If instrumentation details haven't been provided then you will see a box similar to the one below.

Follow the Describe instrument settings button in order to provide instrumentation details.
Select the proper instrument make and model from the choices displayed. If your instrument is not listed, please add it first in the Annotation Data section (see Preparing Annotation Data above).

If you have not altered the instrument by customizing optical filters, light sources, or other hardware components then select the Use default instrument settings check-box and skip to providing optical filter installation dates. As per MIFlowCyt section 3, using default configuration will significantly minimize the effort needed for proper instrumentation annotation. If you have customized the instrument then you should provide the details as stated by MIFlowCyt:
- Select the flow cell type of your instrument from the drop-down selection box. Use the Add new flow cell type button and enter the appropriate type in case your flow cell type is not listed in the drop-down selection box.
- Provide additional flow fluidics information in the Other flow fluidics field (optional). As per MIFlowCyt section 3.3.1.2., this may include the flow cell manufacturer name and model number, flow cell outside shape and dimensions, flow channel shape and dimensions, sheath flow velocity, sheath flow pump type, sample flow velocity and sample flow pump and other relevant details.
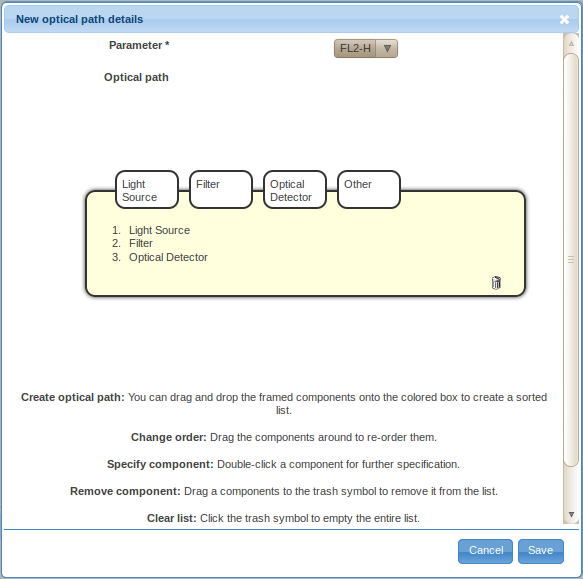
- Click on the Add new optical path in order to describe the optical path for a channel. You will need to describe the optical path for each channel.
- Use the Parameter drop-down selection box to select the FCS parameter (channel) that you are describing the optical path for.
- Specify the basic components of the optical path by dragging and dropping the framed components, i.e., light source, filter, optical detector and other, into the sorted list in the yellow box. You may also drag the labels inside the box around to re-order them, or remove them by dragging them over to the trash bin symbol. By default, the list will already contain a typically triple creating a simple optical path - a light source, a filter and an optical detector. You can also reset to this stage by clicking on the garbage bin symbol.
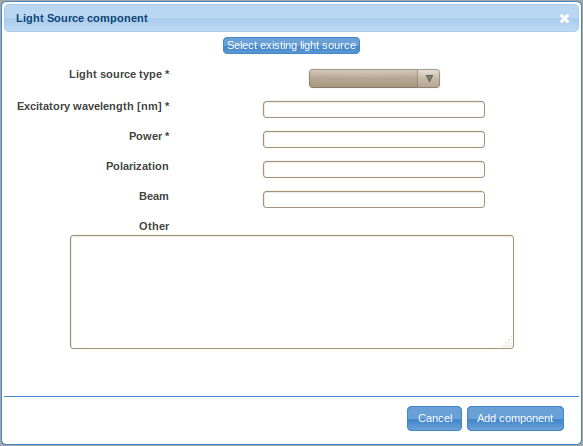
- Double-click on the Light Source label in the ordered list (typically item 1.) to provide details about the light source. There are two ways to specify the details, either by defining a new light source (click on the Create new light source button) or by selecting a previously described light source. For the first optical path, you will likely have to define a new light source. However, you will be able to reuse previously defined light sources by selecting them from the Select existing light source drop-down selection box when defining additional optical path.
- Select the light source type from the drop-down selection box. Specify the excitatory wavelength, power, polarization (optional), beam characteristics (optional) and other relevant information (optional) and save the information by clicking on the Add component button.
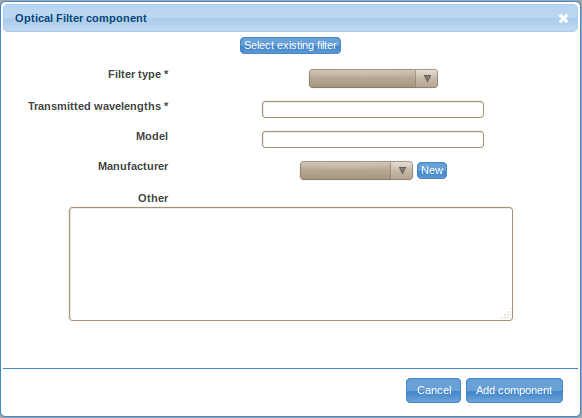
- Double-click on the Filter label in the ordered list (typically item 2.) to provide details about the optical filter. Again, there are two ways to specify the details, either by defining a new filter (click on the Create new filter button) or by selecting a previously described optical filter. You will have to define a new optical filter the first time you need to use it; however, you will be able to reuse previously defined filters by selecting them from the Select existing filter drop-down selection box if these filters are used in multiple optical paths.
- Select the filter type from the drop-down selection box. Specify the transmitted wavelengths, model (optional), manufacturer (optional), and other relevant information (optional). Follow the New link near the manufacturer field if the manufacturer of your optical filter is not included in the list. Provide the name, website (optional), phone number (optional) and other important information (optional) about the manufacturer and save it by clicking on the Save button. Save the new optical filter by clicking on the Add component button.
- Repeat these steps to describe all other optical filters that are on the same optical path.
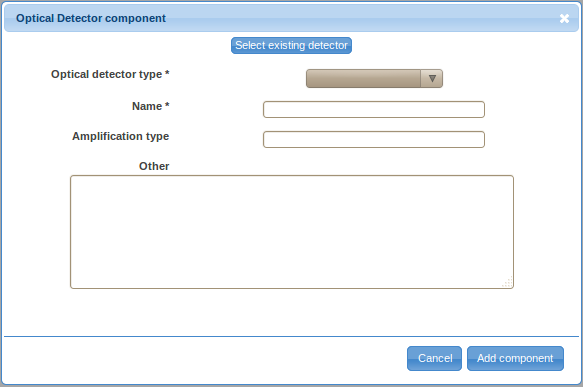
- Double-click on the Optical Detector label in the ordered list (typically the last item) to provide details about the optical detector. Same as before, there are two ways to specify the details, either by defining a new optical detector (click on the Create new detector button) or by selecting a previously described optical detector. You will have to define a new optical detector the first time you need to use it; however, you will be able to reuse previously defined detectors by selecting them from the Select existing detector drop-down selection box if these detectors are used in multiple optical paths (e.g., if multiple signal characteristics, such as the height and area, of a certain signal are captured).
- Select the optical detector type from the drop-down selection box. Specify the name (e.g., PMT A; typically, identifiers assigned by instrument manufacturers make up for a good name), amplification type (optional), and other relevant information (optional). Save the new optical detector by clicking on the Add component button.
- Save the optical path by clicking on the Save button on the New optical path details. The newly created optical path will get added among the existing Optical paths on the Describe instrument settings dialog window.
- Repeat these steps to add the optical path for each measured parameter where applicable (i.e., excluding time). Make sure all the relevant optical paths are selected in the Optical paths selection box; you may add/remove an item from the current selection by holding Ctrl while clicking on the item.
- Provide installation dates for filters in optical paths and other relevant details (optional) in the Describe instrument settings dialog. You may list specific dates for each filter or include a generic statement, such as "all filters came with the instrument purchased on January 15, 2011".
- Finally, check the Use this instrument for all FCS files in this experiment checkbox if you have used the same instrument for all the FCS files or if you are planing to specify differences by parsing these from a CSV file rather than filling out on-line forms. Alternatively, follow the instrument selection procedure for each of the FCS files.
Parsing Instrumentation Details from Spreadsheets
Similar to sample and sample source annotations, some of instrumentation settings may be prepared in the form of a CSV file (spreadsheet) that can be parsed by FlowRepository in order to extract the relevant data. The general approach is the same as mentioned above in the Parsing Information from Spreadsheets section. You can use your favorite CSV-compatible spreadsheet tool to prepare a single table spreadsheet. Provide column headings in the first row. The spreadsheet shall contain a column named FCS File. In addition, there shall be one or more of the following columns:
- Instrument
- Default Instrument Settings
- Optical Filters Installation Dates
- Other Flow Fluidics Information
- Other Instrument Settings Information
- Flow Cell Type
Annotation details shall be provided starting from the row number 2. The FCS File column shall contain file names corresponding to the data files in your experiment. Other cells shall contain values that you wish to assign to instrumentation description related to particular FCS files. You need to specify the instrument before providing other details, i.e., you should include the instrument column in the CSV file before other columns (should you have any) or annotate on-line so that there is an instrument specified before you assign other details. In addition, instruments must exist and must be specified exactly as listed in the Annotation Data; you may add new instruments there if needed. For boolean values (e.g., for the Default instrument settings column, FlowRepository will recognize "1", "t", "true", "yes", "y" as true and "0", "f", "false", "no", "n" as false (values are not case sensitive).
Save the spreadsheet to your local computer as a CSV file with the ".csv" file extension and make sure that the field delimiter is set to comma (','). Upload the CSV file as attachment to your experiment and parse it by clicking on the parse icon (P in circle) next to the CSV attachment listed in the Attachments box. You will need to confirm that you understand the consequences of performing this action. Finally, review the results of extracting information from the spreadsheet by inspecting the information box that will temporarily appear on the of your experiment view.
Data Analysis
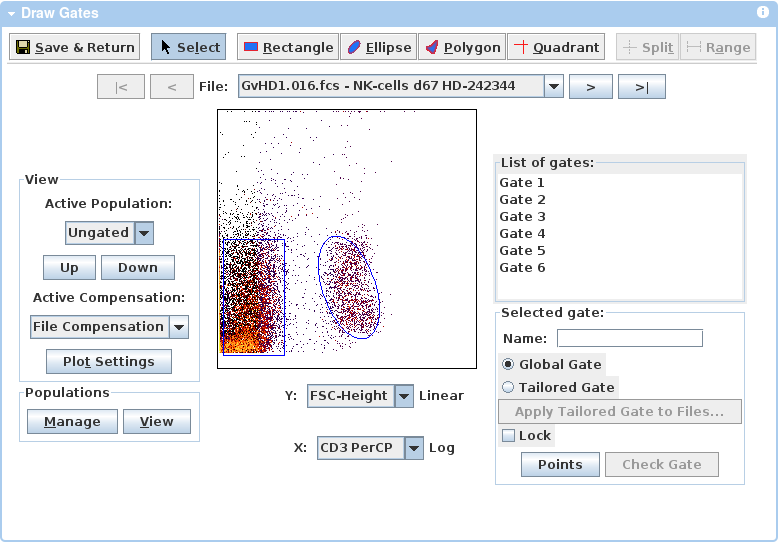
You may analyze your data online within FlowRepository or you may upload relevant files if you analyzed your data using a third party software application. Currently, FlowRepository will consider the data analysis details as provided as long as you upload a Gating-ML file, a FlowJo workspace, an FCS Express layout file, or a FACD DIVA XML file. If you upload any of these then it will become available for users to download; however, they may not be able to effectively use these files unless they purchase the same software tool that you have used. Therefore, it is preferable if you analyze your data online within FlowRepository. The easiest way to do so is to create illustrations, provide appropriate dimensions including populations, and create populations by using the embedded gating tool as shown below. Please see Web-based analysis and publication of flow cytometry experiments (Kotecha et al., 2010) for additional information about the data analysis capabilities offered by the Cytobank platform. Alternatively, populations and illustrations can be created based on gates extracted from imported [Gating-ML 2.0 ] files.
MIFlowCyt Score Report
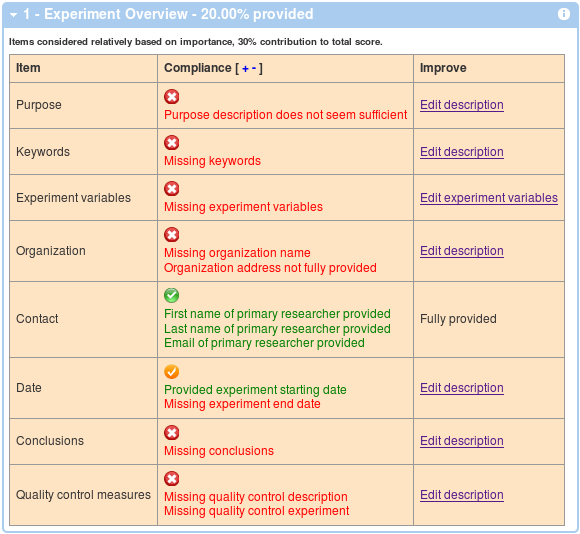
The MIFlowCyt score is a value between 0 and 100% intended to indicate the level compliance of the annotation of a particular experiment with MIFlowCyt. The MIFlowCyt score will be displayed in the top right corner of an experiment overview page as shown below.

The bar changes colors from red to orange to green based on how much annotation has been provided. If you click on the bar (or click on MIFlowCyt Score Details within the Experiment Details box) then you will get to a detailed description of what has been taken into account when calculating your MIFlowCyt score.
Generally, you will see 4 boxes as corresponding to the main 4 sections of the MIFlowCyt Recommendation. The first box will display the Experiment Overview related information. A table with 3 columns will be displayed showing required items, your compliance level and a link to a page where you can improve your score by providing additional details if applicable. You can show and hide details by clicking on the red, orange and green check mark symbol, or you can click on the + and - in the Compliance header in order to show and hide all the details. An example is shown below.
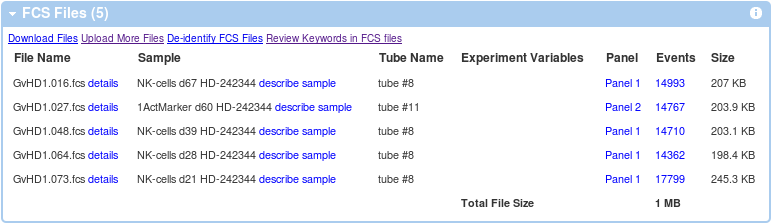
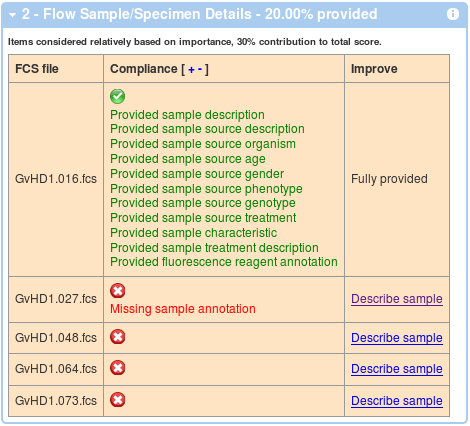
Similar to above, the second box shows a compliance in terms of flow sample annotations. These are calculated (and averaged over) all the FCS files. An example with 1 out of 5 files annotated is shown below. Again, you can improve your score by following the link in the third columns and you can show and hide details by clicking on the red, orange and green check mark symbol, or you can click on the '+' and '-' in the Compliance header in order to show and hide all the details.
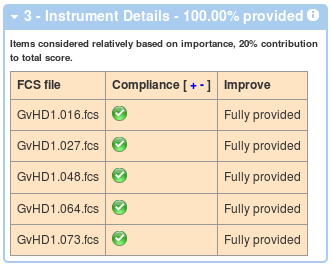
In a similar way, the third box displays information about compliance related to instrumentation details associated with each of the data files.
And finally, the last box shows compliance with the data analysis section of MIFlowCyt.

Share your dataset with reviewers
If you are submitting a paper to a peer-review journal and you would like to share your data with reviewers, return to the experiment summary and click on the Share with Reviewers button inside the Sharing Permissions box.
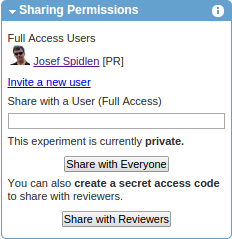
Confirm the message (press OK) notifying you that sharing this experiment with reviewers will also lock your experiment. As a result, the experiment will be locked and a URL with a secret access code will be generated (e.g., https://flowrepository.org/id/RvFra4aTsCvHN0YxrqfcNrwOX5DvygvxQGCBxly2QqZpKbYXrSrpWNswo7XXVood). You may copy and paste this long URL to the cover letter of your manuscript, or to some form provided to you by the journal during the submission process. With this URL, assigned reviewers will be able to obtain anonymous read-only access to the Public View of your experiment. If there are several experiments that you would like to make available to reviewers of your manuscript, a single (shared) access code can also be created to provide an easy access to a specified list of experiments. Please contact FlowRepository administrators if you would like this set up. Once your manuscript is published, the experiment will be made become publicly available without the need for a secret access code. Therefore, there is no need to include this long URL in the actual text of your manuscript. Instead, the text of the manuscript should contain the public FlowRepository identifier (FR-FCM-xxxx) as shown in the header of your experiment summary. This is a permanent identifier that will help readers locate the related dataset once it is made public.
Depending on the journal, your data may automatically become publicly available once the manuscript is published. Please contact FlowRepository.org administrators if unsure. If reviewers ask for changes to your dataset and/or annotation prior to the publication of the manuscript, the editor may arrange for the experiment to be unlocked for you to edit. Should this not be the case, please contact FlowRepository administrators.